9 min read
Dustin Podell of Black Forest Labs, the lab behind the FLUX image models, named photo restoration as one use his team never planned for. Speaking on the Latent Space podcast episode released on November 16, 2026, he said the lab saw “a ton of people taking old, degraded family photos and then restoring, colorizing them, fixing them up,” and that the model “was able to keep a very, very high level of similarity to what the original would’ve been.” Watching people show those restored pictures to their families, he added, was his favorite thing to come out of the work[1].
If you have a shoebox of faded prints and want to try the same thing, the order of operations matters more than which tool you pick. Everything below comes from vendor documentation and US preservation guidance checked on November 17, 2026. I did not pay for the commercial tools and run a restoration, so there is no quality comparison here. The question this answers is where the resolution goes, using the input and output limits each service publishes.
The scan sets the ceiling
An editing model fills in what is no longer legible with something plausible. A thin scan gives it less to work from and more to invent.
The Federal Agencies Digital Guidelines Initiative (FADGI), a group of US federal agencies that publishes shared digitization standards, sets four star levels for photographic prints in the third edition of its Technical Guidelines for Digitizing Cultural Heritage Materials. The recommended sampling frequency runs 200 ppi at one star, 250 ppi at two, 400 ppi at three, and 600 ppi at four. Pixels per inch (ppi) is the same number your scanner calls dpi. Preservation masters go to TIFF or JPEG 2000, and the top level asks for 16-bit color even when the original is black and white. A footnote adds that “in rare cases, resolutions higher than 600 ppi may be needed to resolve fine details”[2].
A consumer flatbed will do 600 ppi, which produces files of these sizes.
| Print size | 300 ppi | 600 ppi |
|---|---|---|
| 3.5 × 5 in | 1,050 × 1,500 (1.6 MP) | 2,100 × 3,000 (6.3 MP) |
| 4 × 6 in | 1,200 × 1,800 (2.2 MP) | 2,400 × 3,600 (8.6 MP) |
| 8 × 10 in | 2,400 × 3,000 (7.2 MP) | 4,800 × 6,000 (28.8 MP) |
Source: print dimensions at the FADGI sampling frequencies[2]
Take a group shot on a 4 × 6 print where one person’s head is 12 mm tall, just under half an inch. At 300 ppi that face lands in 142 pixels. At 600 ppi it gets 283. That gap is how much the model has to work with when you ask it to bring the face back.
Leave the scan file alone
FADGI is blunt about the master file: “Color, tone enhancement or restoration is not allowed on master images.” Corrections belong in access versions, and the guidance asks that they be noted in embedded metadata and file naming. Even removing dust that sat on the scanner glass is off limits in the master[2]. Once a file has been corrected, it no longer records what the photograph looked like.
The US National Archives makes the same point for family collections: “Keep your originals after you digitize them, because digital files have their own preservation risks and can easily be lost.” It also warns that automatic feed scanners “are not suitable for fragile, weak, bent, or valuable papers,” and says to check that the original fits entirely on the scanner bed[3].
Handling guidance is published too. The Library of Congress says to handle prints with clean hands or clean nitrile gloves, to avoid touching the image area, and never to put tape or sticky notes on a photograph[4]. The National Archives goes further and asks for gloves on photographs and negatives, because fingerprints leave permanent stains[3]. FADGI allows holding a curled print flat under glass, but only when flattening will not crack the emulsion, and it says tightly curled material must not be forced[2].
Each tool accepts a different size
Three families of editing models are usable for this. The numbers below come from each vendor’s own documentation. The 1K, 2K and 4K labels are output size tiers: roughly one megapixel (about 1,024 × 1,024), four megapixels and sixteen megapixels[5].
| Tool | Reference images | Output size | Price |
|---|---|---|---|
| Gemini app (Nano Banana 2) | several supported | free accounts download at 1K, Google AI plans at 2K[8] | included in the plan; via API, $0.0336 per 1K image and $0.113 per 4K image[9] |
| OpenAI image models (GPT-Image-2.5 and 2.6) | no stated cap; edit input and mask under 50 MB | neither edge above 3,840 px, total 655,360 to 8,294,400 px[11] | $30 per million image output tokens[11] |
| FLUX 3 Image | up to 10[6] | 2K and 4K[6] | $0.048 at 1K, $0.10 at 2K, $0.607 at 4K[5] |
| FLUX 3 Image Klein (open weights) | up to 10[7] | up to 4K[7] | free to run locally, or $0.009 per 1K image via API[5] |
Source: vendor documentation, checked November 17, 2026
Klein is the open-weights member of the family, meaning the model weights are published for download. Black Forest Labs lists it at 5.6 billion parameters and says it “runs on a single consumer GPU,” distributed through Hugging Face[7]. That is the option if you would rather not upload family photographs to someone else’s server, though it asks for a graphics card and an afternoon of setup. Shrinking a large model to fit a home machine is covered in the guide to quantization.
The Gemini app carries one more condition. Google states that “to generate and edit images, you must be 18 or over,” and that editing images is not available to users under 18 at all[8].
A 600 ppi scan is not what the model sees
Black Forest Labs spells this out on its pricing page: “Reference images up to 16 MP are accepted (larger ones are rejected); images above 4 MP are downscaled to 4 MP before processing.” The company counts one MP as 1,048,576 pixels[5].
Scan a 4 × 6 print at the recommended 600 ppi and you have 8.6 million pixels. Held to the 4 MP ceiling it becomes 1,672 × 2,508, keeping 70 percent of the long edge. An 8 × 10 scanned at 600 ppi comes to 28.8 million pixels, over the 16 MP limit, and is refused outright. Feeding several reference images shrinks things further. The previous generation, FLUX.2, downscales each reference above 1 MP to 1 MP when more than one is supplied[5], which takes that 4 × 6 scan down to 836 × 1,254.
| Stage | Size of a 4 × 6 photo | 12 mm face |
|---|---|---|
| 600 ppi scan master | 2,400 × 3,600 | 283 px |
| after the 4 MP input ceiling | 1,672 × 2,508 | 198 px |
| with multiple references on FLUX.2, 1 MP each | 836 × 1,254 | 99 px |
| downloaded at 1K on a free account | 1,024 long edge | 81 px |
Source: calculated from the limits each service publishes
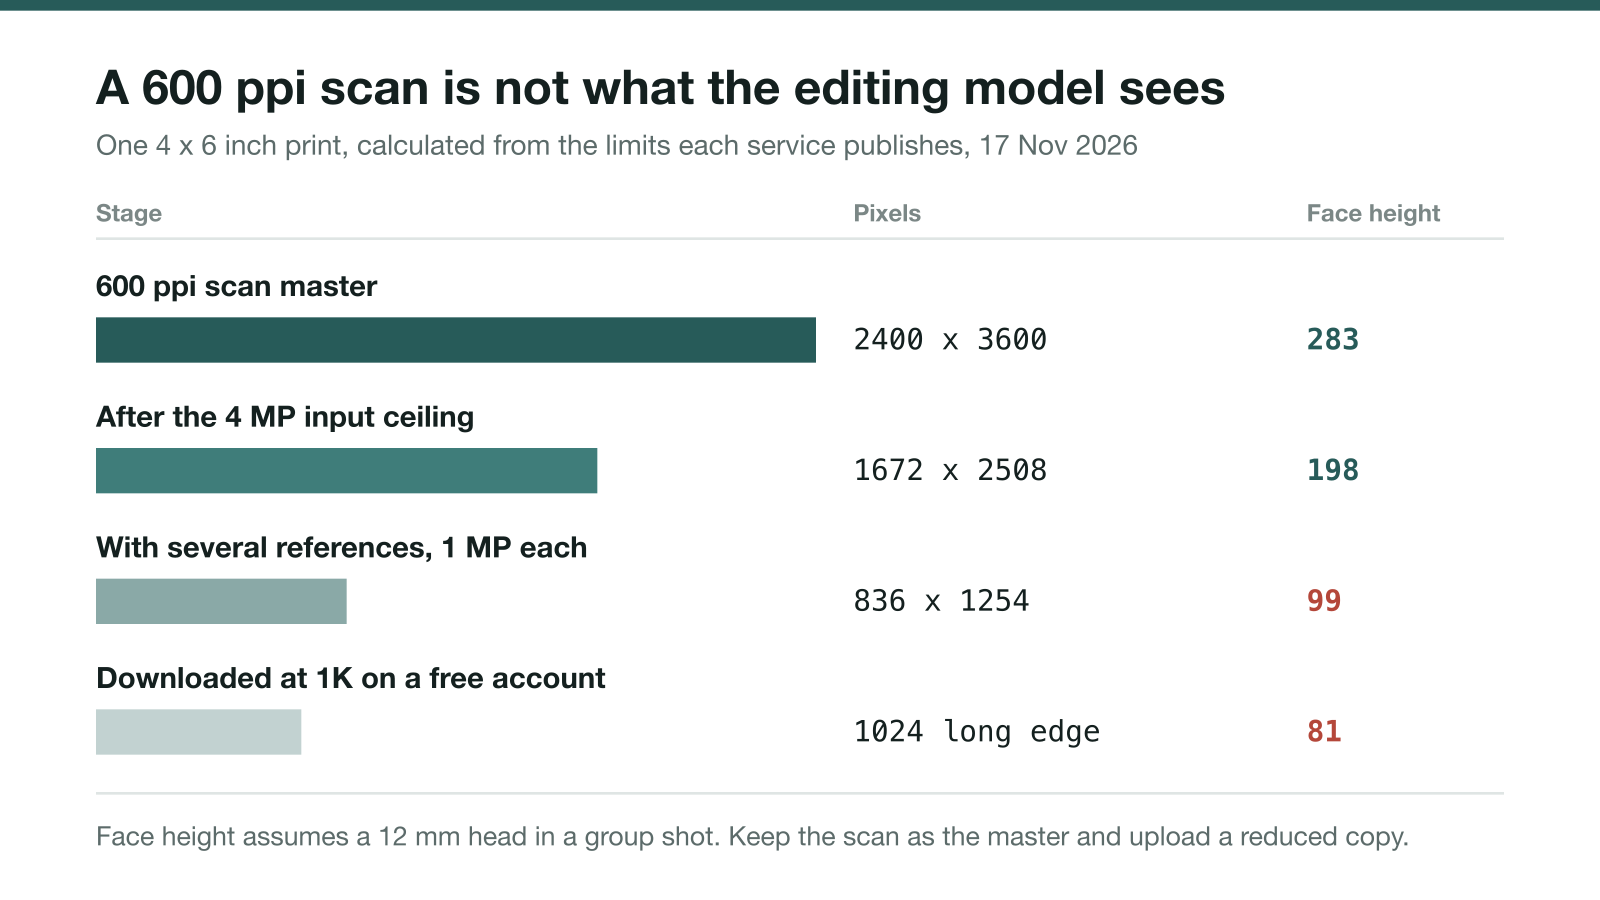
Shrink the file yourself before you upload it. The service will cut it down regardless, and doing it at home means the dimensions coming back are ones you picked. Printing the result calls for a paid tier that outputs at 2K or 4K. A free Gemini account caps downloads at 1K, which hands you a file smaller than the scan you worked to make[8].
Write down what must not change
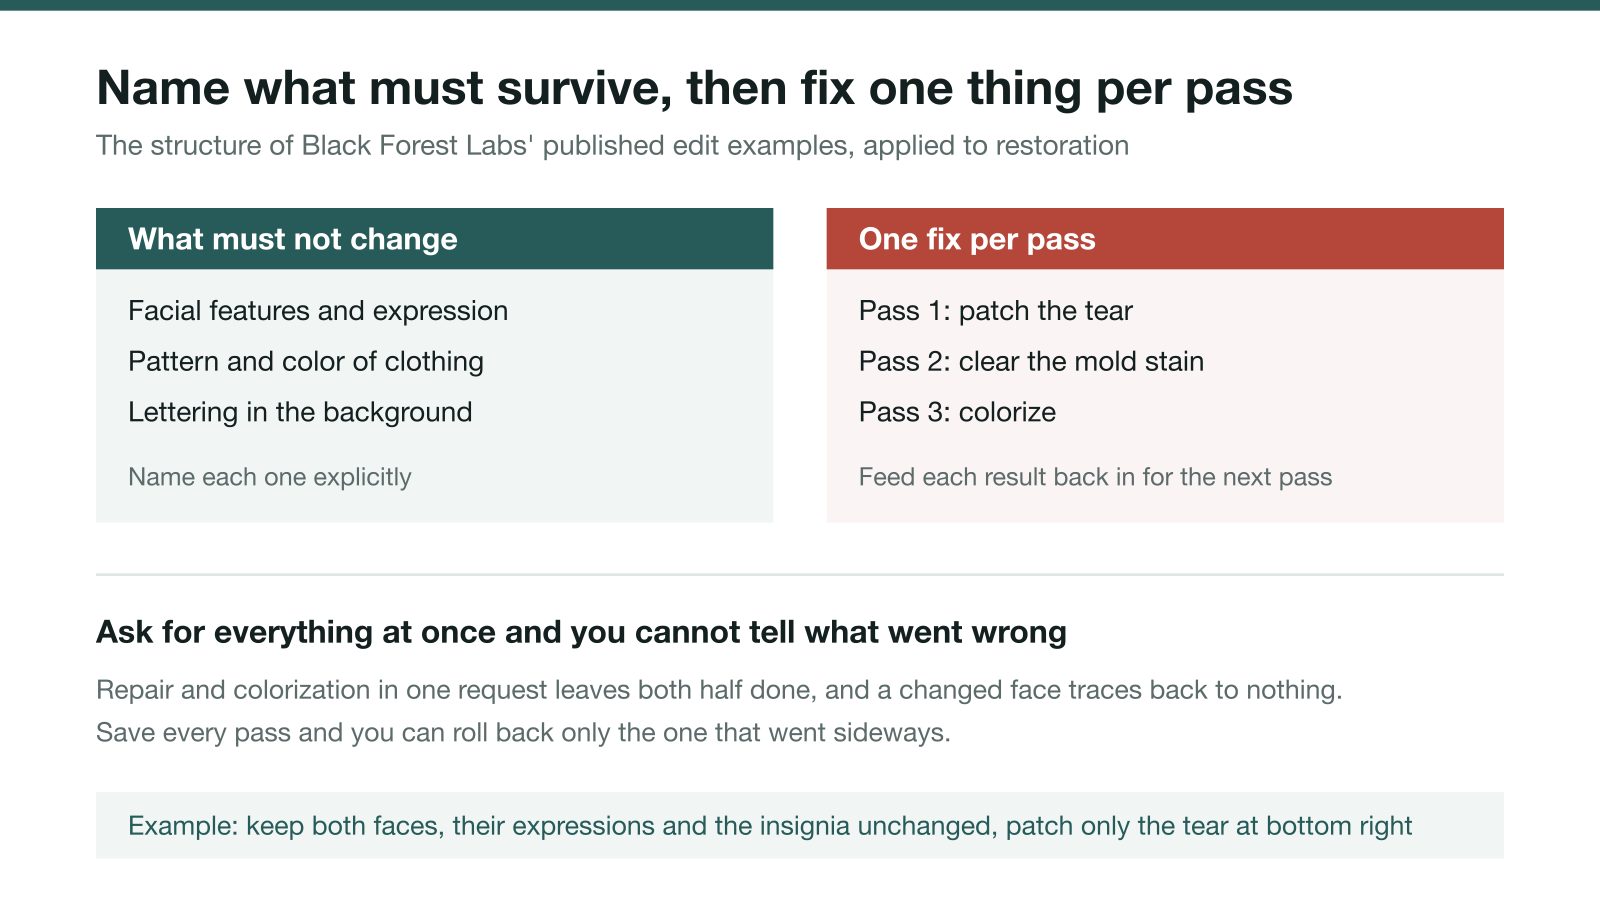
A prompt for an editing model works differently from one that asks for a new picture. The edit example Black Forest Labs publishes for FLUX 3 Image spends most of its words on what to leave alone: “Keep the large cresting ocean wave, the overcast and cloudy sky, and the rest of the black and white composition exactly unchanged”[6]. The sample prompts on the FLUX.1 Kontext page run short instead, single sentences like “Remove the thing from her face” or “Tilt her head towards the camera”[12].
Kontext was the model that first shipped this kind of editing. Podell called the earlier workflow a slot machine: reprompt until something good falls out, or paint over the region you dislike and have the model fill the gap. Keeping the same face across images meant training a small add-on for that one person, a LoRA, on top of the base model[1]. Being able to write “leave this person alone and patch the tear behind them” is what replaced that.
Carried over to restoration, the prompt becomes four steps.
1. Name what must survive first: facial features, expressions, the pattern on a dress, lettering in the background.
2. Name one thing to fix. A tear, a mold stain, a crease, one per pass.
3. Save colorization for its own pass. Asked to repair and colorize at once, a model does both badly and leaves you unable to tell which instruction went wrong.
4. Feed a good result back in for the next change. Saving each pass lets you roll back only the one that went sideways.
Four ways this goes wrong
Most of the damage comes from four habits.
Writing the result over the scan file tops the list. A restoration is an interpretation with guesswork in it, which is exactly why preservation bodies keep masters and access copies apart[2].
Uploading the largest file you have rarely helps. An 8 × 10 scanned at 600 ppi is rejected by FLUX 3[5], and anything that does get through is reduced anyway.
Throwing in several photographs at once backfires too. Adding other pictures of the same person looks like it should help the face, but with more than one reference some products cut each to 1 MP[5]. Pick one or two that earn their place.
Last, do not circulate a restoration as though it were the photograph. Send it to relatives without saying what it is, and two forwards later that is the family record.
What the models cannot do
The face that comes back is a guess. Podell’s own phrasing was that the model stayed close to “what the original would’ve been”[1]. Detail that is genuinely gone, the real shape of a blown-out eye or the lettering on an unreadable name badge, gets filled with something that looks right. Text inside images is still unreliable, which both guests acknowledged, and Andreas Blattmann, Podell’s co-guest and a co-inventor of the latent diffusion method behind Stable Diffusion, said controllability is the problem the field still has to solve at scale[1].
Google documents that “all generated images include a SynthID watermark,” an invisible signal mixed into the pixels that software can read back[10]. To check later whether a file went through Google’s models, upload it in the Gemini app and ask whether it was created or edited by Google AI. That runs about ten checks per 24 hours, and it recognizes content from Google’s tools only[13].
The order, in short
1. Handle prints with clean hands or nitrile gloves and stay off the image area[4]. Do not force a curled photograph flat[2].
2. Scan on a flatbed at 600 ppi, 16-bit, to TIFF. Scan black and white prints in color mode[2].
3. Keep that file as the master and edit nothing in it[2].
4. Make a copy and shrink it to roughly 2,500 pixels on the long edge, under the 4 MP input ceiling[5].
5. Prompt one pass at a time, naming what must not change before what should.
6. Colorize only after the damage is repaired.
7. Save results under new names and record what was changed[2].
8. Tell relatives the picture is a restoration when you send it.
Notes
- Latent Space podcast, “Building Visual Intelligence — Andreas Blattmann & Dustin Podell, Black Forest Labs,” released November 16, 2026. Quotes taken from the episode transcript; speaker attribution follows the episode write-up. Episode ↩
- FADGI, Technical Guidelines for Digitizing Cultural Heritage Materials, third edition (2023), section 3.8 Prints and Photographs. Guidelines ↩
- US National Archives, “Digitizing Family Papers and Photographs” and “Tips for Handling Family Papers and Photographs.” Digitizing guidance ↩
- Library of Congress, “Care, Handling and Storage of Photographs.” Guidance ↩
- Black Forest Labs pricing page, checked November 17, 2026. bfl.ai/pricing ↩
- Black Forest Labs, FLUX 3 Image model page. Model page ↩
- Black Forest Labs, FLUX 3 Image Klein model page. Model page ↩
- Google Gemini Help, “Generate and edit images with the Gemini app.” Help center ↩
- Google AI Studio pricing, Gemini Nano Banana 2.1 section. Pricing ↩
- Google AI Studio image generation documentation. Docs ↩
- OpenAI image generation guide and API pricing page. Guide ↩
- Sample prompts on the Black Forest Labs FLUX.1 Kontext model page. Model page ↩
- Google Gemini Help, checking whether content was made with Google AI. Help center ↩
Source: https://www.latent.space/p/bfl